• Skip to primary navigation
  • Skip to main content
  • Skip to primary sidebar
  • Skip to footer
The Gracious Wife logo
  • Recipes
  • Family
    • Love & Marriage
    • Parenting
  • House & Home
    • Kitchen and Cooking Tips
    • Cleaning & Organization
    • Budget
  • Nav Social Menu

    • Facebook
    • Instagram
    • Pinterest
    • Twitter
    • YouTube

Home » For The Home » Crafts & DIY

Binding Your Quilt - Quilting for Beginners Pt. 5

Jan 29, 2015 · 10 Comments

  • Share
  • Tweet
  • Yummly
  • Mix

Part 5 in a 5-part Quilting for Beginners series.  This Binding Your Quilt section will walk you through binding your quilt and adding finishing touches to your quilt.  Make your own DIY sewing quilt with this step-by-step tutorial!

Binding Your Quilt - Part 5 in a 5-part Quilting for Beginners series.  This Basting and Quilting section will walk you through binding your quilt and adding finishing touches to your quilt.  Make your own DIY sewing quilt with this step-by-step tutorial!
Photo: DollarPhotoClub.com

Binding Your Quilt - Quilting for Beginners Part 5

We're FINALLY back in business with the last part in our 5-Part quilting series, How to Make A Quilt for Beginners, and we're going to finish off the series and your quilt with binding.

With all the work you've done so far, I can pretty much guarantee that this will be cake.

See all FIVE PARTS of the How to Make a Quilt Series on the Main Page.
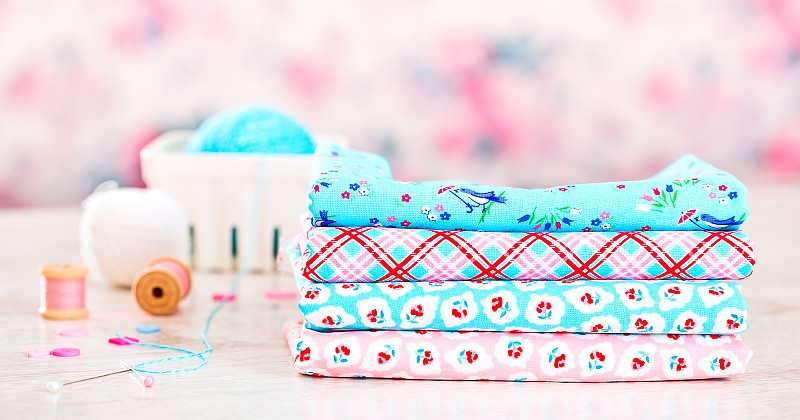
 

Binding Fabric

Binding is basically the strips of fabric that are going to connect the top of your quilt to the backing.  Let's talk about fabric first.  You will want a sturdy fabric for your binding.  The cotton like you used for your quilt top will work just fine, just stay away from those paper thin fabrics used for linings and such.


Binding Your Quilt - Part 5 in a 5-part Quilting for Beginners series.  This Basting and Quilting section will walk you through binding your quilt and adding finishing touches to your quilt.  Make your own DIY sewing quilt with this step-by-step tutorial!

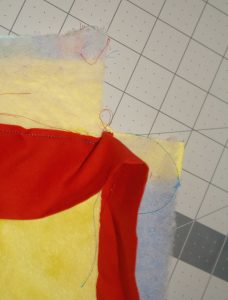
I haven't mentioned this yet, so before we begin, you're going to need to cut a square out of each of the corners of your backing and batting (like the picture above), so that you can have clean, mitered corners.

Binding Your Quilt:

Ok.  So you've basted and quilted your quilt and you know what kind of fabric you need, so let's get started.

1.  Start off by cutting your binding fabric into strips.  In this tutorial, I made a twin-sized quilt, so I cut my fabric into 4-½ inch wide strips.  I recommend using this width for twin-sized or larger quilts.  If you're making a baby or crib quilt, you can probably use 2-½ to 3 inch wide strips, but you'll also have to trim down your backing and batting a bit.

So, using your rotary cutter, ruler, and cutting mat, cut your binding into strips.  To find out how many strips you need, find the perimeter of your quilt top (add the length of all 4 sides together), then add 20, then divide by the length of your strips and round up.

My quilt perimeter was 231 inches.

231 + 20 = 251 inches

My strips were 74 inches long, so 251 divided by 74 is 3.4.  So I needed 4 strips

Binding Your Quilt - Part 5 in a 5-part Quilting for Beginners series.  This Basting and Quilting section will walk you through binding your quilt and adding finishing touches to your quilt.  Make your own DIY sewing quilt with this step-by-step tutorial!

Binding Your Quilt - Part 5 in a 5-part Quilting for Beginners series.  This Basting and Quilting section will walk you through binding your quilt and adding finishing touches to your quilt.  Make your own DIY sewing quilt with this step-by-step tutorial!

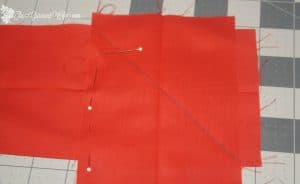
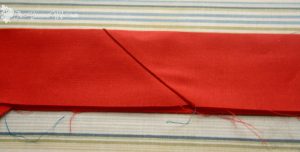
2.  Next we're going to sew together our strips to make one long, continuous binding strip.  Lay one strip flat horizontally.  Lay another strip vertically on top of the first strip on the end.  Pin to hold it in place.  I like to pin in an "L" shape so that I don't have to sew over the pins.

Mark a line at 45°, then using your sewing machine, sew right on that line.  Trim off the excess a quarter inch away from the seam.  Then split the seam and iron the edges down, one on each side.

Binding Your Quilt - Part 5 in a 5-part Quilting for Beginners series.  This Basting and Quilting section will walk you through binding your quilt and adding finishing touches to your quilt.  Make your own DIY sewing quilt with this step-by-step tutorial!

Binding Your Quilt - Part 5 in a 5-part Quilting for Beginners series.  This Basting and Quilting section will walk you through binding your quilt and adding finishing touches to your quilt.  Make your own DIY sewing quilt with this step-by-step tutorial!

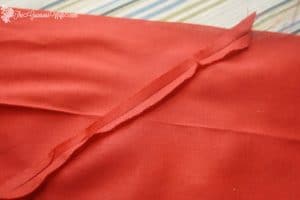
Continue this process until all of your binding strips are connects.

BE CAREFUL! Always make sure your original strip (the longest one that you keep adding onto) is the horizontal strip on bottom.  If you switch the placement, your seams will be on opposite sides and will be exposed later on this process.

Binding Your Quilt - Part 5 in a 5-part Quilting for Beginners series.  This Basting and Quilting section will walk you through binding your quilt and adding finishing touches to your quilt.  Make your own DIY sewing quilt with this step-by-step tutorial!

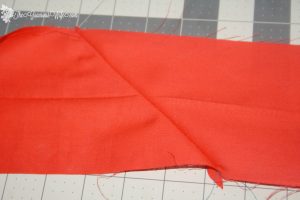
3.  Fold your binding strip in half length-wise. Now iron the strip that way so it stays.

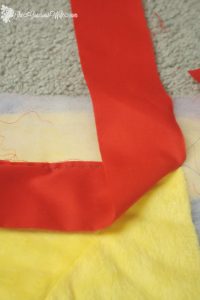
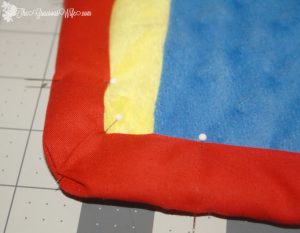
4.  Next is a placement rough draft.  No pinning needed for this part.  Place your binding strip on your quilt top so that the open edges are in line with the outer edge of the quilt top.  Don't start at a corner! Start about half-way on one of the sides.

Binding Your Quilt - Part 5 in a 5-part Quilting for Beginners series.  This Basting and Quilting section will walk you through binding your quilt and adding finishing touches to your quilt.  Make your own DIY sewing quilt with this step-by-step tutorial!

Binding Your Quilt - Part 5 in a 5-part Quilting for Beginners series.  This Basting and Quilting section will walk you through binding your quilt and adding finishing touches to your quilt.  Make your own DIY sewing quilt with this step-by-step tutorial!

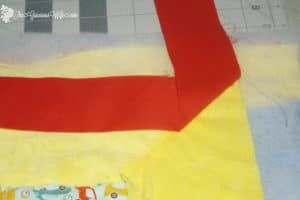
Line your binding strip up around the edges of your quilt.  When you get to a corner, fold the strip up, away from the quilt top so that it's creased at a 45° angle.  Then fold it back down against the next edge of your quilt top.  These will be your mitered corners.

Continue all the way around your quilt top.  Check to make sure that none of the seams on the binding strips are in the corners.  If they are just adjust a couple of inches here and there until it's right.

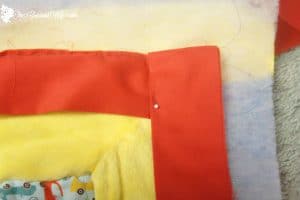
When you've got it laid out right, pin just the starting edge so you know where to start.


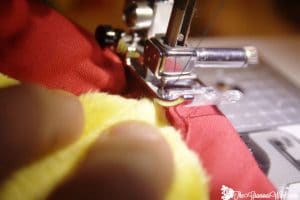
5.  Now we're going to sew the binding strip to the quilt top.  Don't start right at the beginning of the strip where you have it pinned.  Start about 3-4 inches in from there.  Be sure to back stitch and use the quarter inch seam.

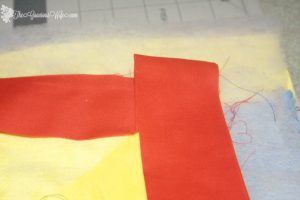
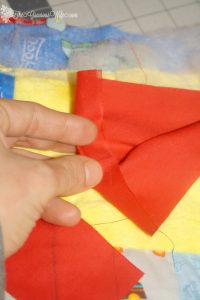
Stop stitching a quarter inch before you reach the corner of your quilt top, back stitch, release the foot, and remove your quilt.  We're going to use the same technique as in step 4, only we'll be pinning for accuracy this time.

Binding Your Quilt - Part 5 in a 5-part Quilting for Beginners series.  This Basting and Quilting section will walk you through binding your quilt and adding finishing touches to your quilt.  Make your own DIY sewing quilt with this step-by-step tutorial!

Binding Your Quilt - Part 5 in a 5-part Quilting for Beginners series.  This Basting and Quilting section will walk you through binding your quilt and adding finishing touches to your quilt.  Make your own DIY sewing quilt with this step-by-step tutorial!

So fold your binding strip up, away from the quilt top to create a 45° crease, then back down so that it's in line with the side of the quilt top again.  Pin your crease.  Then continue stitching until you're about 4 inches away from where the start of your binding strip is pinned. (You should have an eight-ish inch gap there now)


Binding Your Quilt - Part 5 in a 5-part Quilting for Beginners series.  This Basting and Quilting section will walk you through binding your quilt and adding finishing touches to your quilt.  Make your own DIY sewing quilt with this step-by-step tutorial!

6.  Connecting the start and the end pieces.  Unpin your starting point, and unfold it so that it's full width.  Fold the outside edges inward so that we won't see the ugly edges of the fabric.  Iron the strip so the fold stays.

Trim your ending point so that it's only about 2 inches past where it will meet the starting strip.  Place this strip inside of the starting strip (Think double deck-er taco here. Nothing complicated).  Then pin the 2 strips together.

Finish attaching the binding by starting to stitch at least an inch before you ended sewing. Be sure to back stitch, and continue stitching until you reach about an inch past the starting point.


Binding Your Quilt - Part 5 in a 5-part Quilting for Beginners series.  This Basting and Quilting section will walk you through binding your quilt and adding finishing touches to your quilt.  Make your own DIY sewing quilt with this step-by-step tutorial!

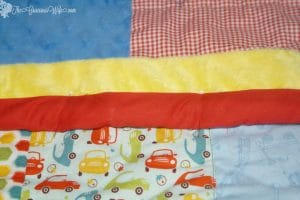
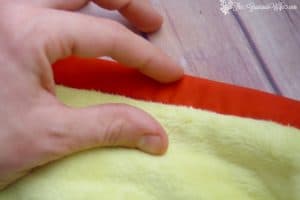
7.  Fold your binding strip up so you can wrap it around to the backing of the quilt.  You're going to need lots of pins for this part.  Line the edge up with the seam that you stitched on the other side.  Then move the strip up an eighth of an inch and pin. Continue this process all the way around the quilt.  Because of the folding you did on the other side for the corners, the corners will pretty much fold themselves on this side.  Just tuck them under and pin on the diagonal.

Binding Your Quilt - Part 5 in a 5-part Quilting for Beginners series.  This Basting and Quilting section will walk you through binding your quilt and adding finishing touches to your quilt.  Make your own DIY sewing quilt with this step-by-step tutorial!


8.  The final stitching.  You're actually going to be sewing with the quilt top facing up.  Starting at a corner, start stitching in the ditch of the seam of where you just stitched the binding strip to the quilt top.  When you get to a corner, release the foot, and just turn your quilt and start sewing again.

Be sure to back stitch when you start and finish.

Binding Your Quilt - Part 5 in a 5-part Quilting for Beginners series.  This Basting and Quilting section will walk you through binding your quilt and adding finishing touches to your quilt.  Make your own DIY sewing quilt with this step-by-step tutorial!

Binding Your Quilt - Part 5 in a 5-part Quilting for Beginners series.  This Basting and Quilting section will walk you through binding your quilt and adding finishing touches to your quilt.  Make your own DIY sewing quilt with this step-by-step tutorial!

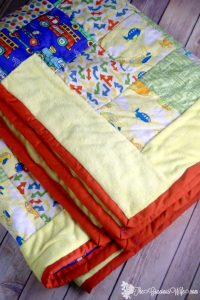
9.  Final touches.  Take the pins out of the quilt.  Trim up any loose strands hanging from your quilt. And that's it!

You're done! Do a happy dance!

I would love to see a picture of your finished quilt over on my Facebook page! Stop on by and share your accomplishment!


Binding Your Quilt - Part 5 in a 5-part Quilting for Beginners series.  This Basting and Quilting section will walk you through binding your quilt and adding finishing touches to your quilt.  Make your own DIY sewing quilt with this step-by-step tutorial!


Quilting for Beginners: Make beautiful DIY quilts even if you're a quilting or sewing newbie. A tutorial and tip guide for making a quilt from start to finish. Quilting for Beginners teaches newbies how to quilt from the basics, start to finish. This 5 part series walks you through each step of quilt making. 

Did you like this Piecing and Finishing Your Quilt Top section? Find more like it on my Sewing and DIY & Crafts boards on Pinterest!

If you liked this Piecing and Finishing Your Quilt Top section, you might also like these fun sewing projects!

Quilting for Beginners: Make beautiful DIY quilts even if you're a quilting or sewing newbie. A tutorial and tip guide for making a quilt from start to finish. Quilting for Beginners teaches newbies how to quilt from the basics, start to finish. This 5 part series walks you through each step of quilt making. 

Quilting for Beginners - 5 Part Series


DIY Washable Reusable Bowl Covers - Sew these fun and easy reusable bowl cover DIY project | From TheGraciousWife.com

DIY Washable Reusable Bowl Covers


Easy DIY Bandana Tablecloth - An easy DIY sewing craft made from ordinary bandanas. The patriotic red white and blue are super cute for 4th of July and Summer!

Easy DIY Bandana Tablecloth

See More DIY & Crafts Projects

Never Miss a Thing!

Join our newsletter to get new recipes, tips, tricks, and tutorials every week!

Success! Now check your email to confirm your subscription.


There was an error submitting your subscription. Please try again.


Binding Your Quilt - Part 5 in a 5-part Quilting for Beginners series.  This Basting and Quilting section will walk you through binding your quilt and adding finishing touches to your quilt.  Make your own DIY sewing quilt with this step-by-step tutorial!

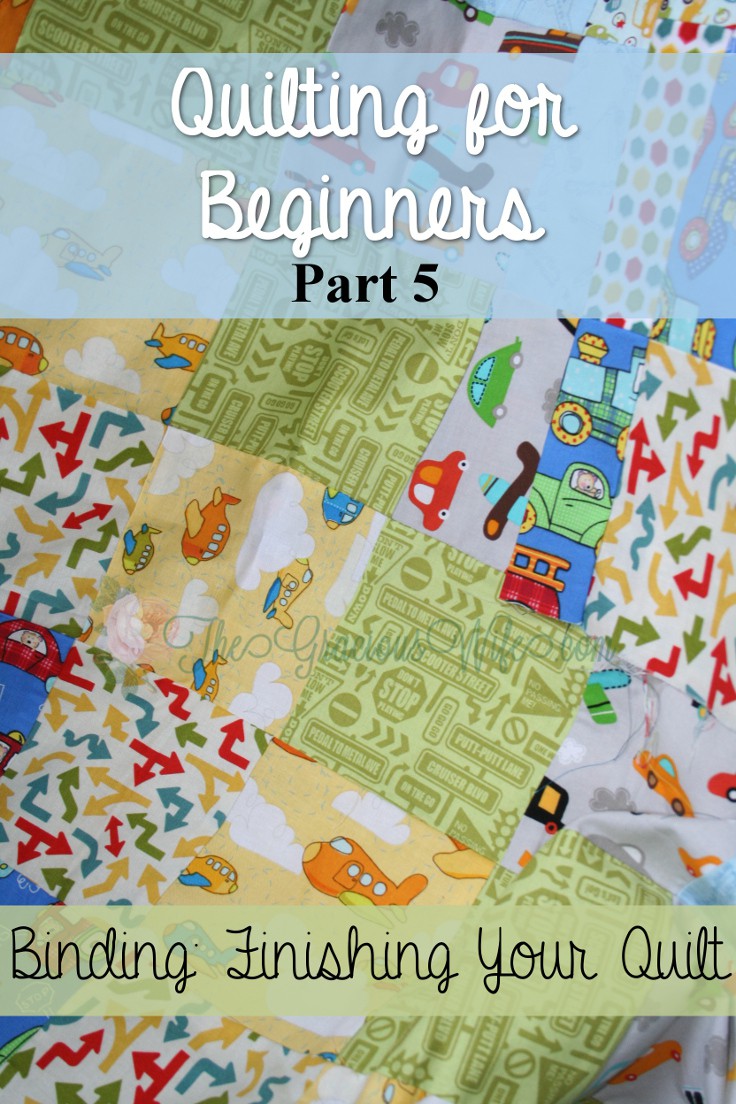
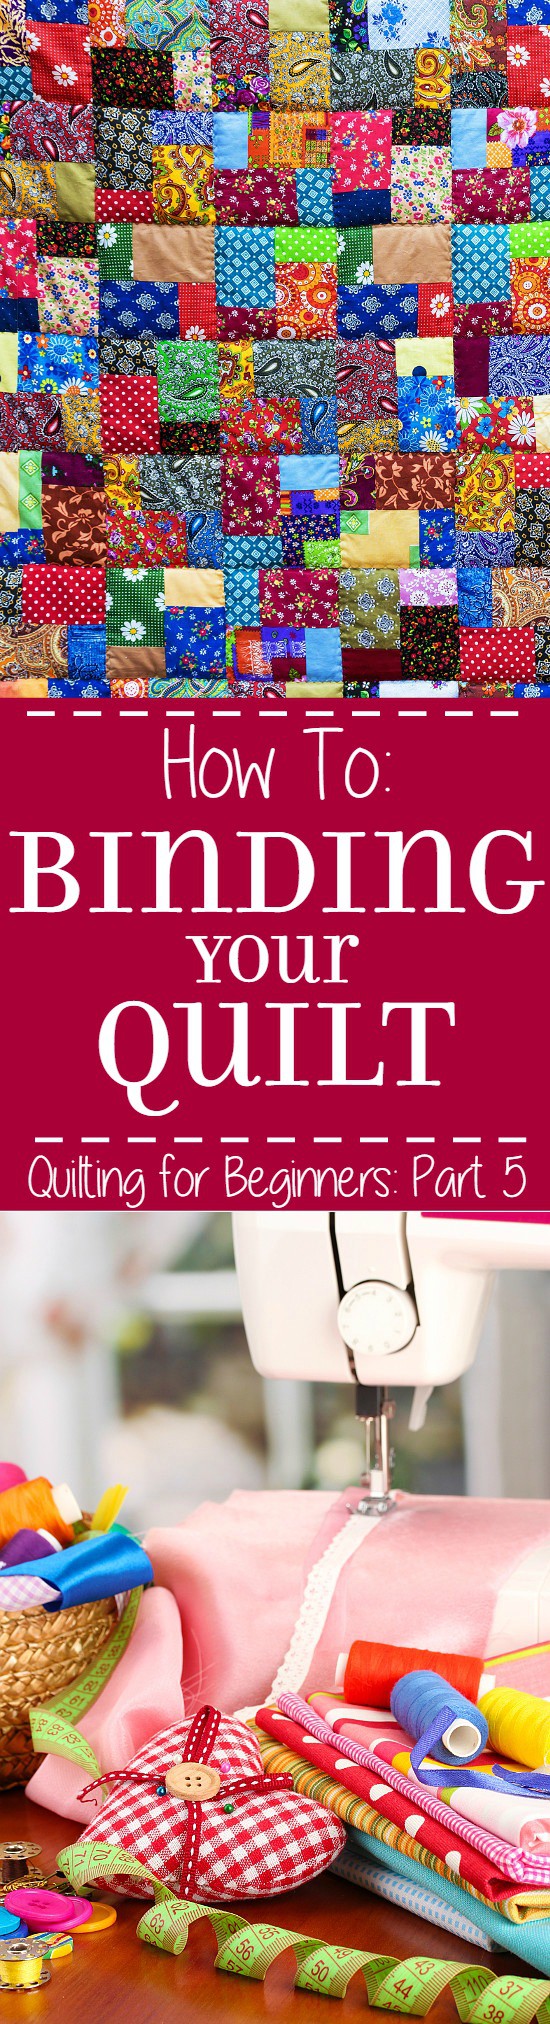
Photo Credit: DollarPhotoClub.com

« Valentine's Day Heart Felt Garland
Valentine's Day Heart Paper Garland- 2 Tutorials! »
  • Share
  • Tweet
  • Yummly
  • Mix

Crafts & DIY, For The Home Crafts, DIY, Quilting for Beginners, Sewing

Reader Interactions

Comments

  1. Pam says

    April 21, 2015 at 3:49 pm

    thanks enjoyed it! Cant wait until I can start my quit

    Reply
  2. Jean says

    October 06, 2015 at 9:10 pm

    Thanks so much. This was a great tutorial for me as a beginner.

    Reply
    • Michelle says

      October 08, 2015 at 8:14 am

      You're welcome! I'm so glad to help!

      Reply
  3. mary says

    February 15, 2016 at 10:14 am

    thank you so much for your tutorial I so much appreciate it .. all the best

    Reply
  4. Elizabeth Rasco says

    July 21, 2016 at 10:49 am

    I'm a little confused about sewing the edge once you've folded it over, you're supposed to make sure that the raw edge won't be showing, so there's quite a bit of folding, right? Also, what does sewing in the ditch mean?

    Reply
    • Michelle says

      July 22, 2016 at 7:46 am

      We actually folded the strips in half so that there would be less folding over. You shouldn't need to do any edge tucking as long as you follow the directions. And sewing in the ditch means you're sewing in an already-sewn seam. I talk more about ditch quilting in Part 4.

      Reply
  5. Tracy Hayman says

    February 11, 2017 at 9:49 pm

    I enjoyed it very much. Thank you for making it simple enough for me to understand.

    Reply
  6. rita says

    November 02, 2020 at 12:25 pm

    Thank you for a well written and altogther explanation. Now I have only one place to go to for learning how to quilt.

    Reply
  7. Alison says

    January 15, 2021 at 5:49 am

    Hi! Love the tutorial to help me with my first quilt! I wanted to know whether I should sew the raw edges on the underside of the quilt to prevent fraying? Thank you!

    Reply
    • Michelle says

      January 18, 2021 at 10:51 am

      Most of the time that's not necessary.

      Reply

Leave a Reply Cancel reply

Your email address will not be published. Required fields are marked *

Recipe Rating


Primary Sidebar

Picture of Michelle Medlin, The Gracious Wife

Hello! I'm Michelle!
I'm a comfort food lover and self-taught cook with five amazing kids and a firefighter husband, surviving mostly on coffee. I love to create easy and delicious family recipes, and share creative family tips I've learned along the way.
Welcome to The Gracious Wife!
MORE ABOUT ME>>

Stack of 4 zucchini fritters on a concrete backdrop with chives scattered all around. The top fritter is topped with sour cream and chopped chives.

Air Fryer Zucchini Fritters

Blueberry crisp topped with vanilla ice cream with a spoon in the middle on a small white plate with a white marble background

Blueberry Crisp

side view of blueberry buckle topped with whipped cream on a small plate with fresh blueberries

Classic Blueberry Buckle

Overhead view of a large cast iron skillet with sauteed zucchini and squash topped with grated parmesan cheese

Sautéed Zucchini and Squash

Stack of corn fritters topped with sour cream and freshly chopped chives on a rustic wood background.

Easy Corn Fritters

Berry spritzer with frozen strawberries and blueberries and a red striped straw in a mason jar.

Berry Spritzer

More Recipes & Ideas

What's Trending Now:

  • A corner slice of chicken pot pie with golden crust on a small plate with a fork with a bite on it, on a rustic wood background with a striped linen The BEST Chicken Pot Pie
  • Homemade mayo in a mason jar with a butter knife scooping some out, with lemons and an immersion blender in the background Homemade Mayonnaise
  • 20 Non Sandwich School Lunch Ideas for kids - Make back to school lunches exciting this school year with these 20 yummy and easy non-sandwich school lunch ideas that your kids will love! Perfect back to school lunch ideas. My kids will love these.  20 Non-Sandwich School Lunch Ideas
  • Slice of crockpot breakfast casserole on a white plate with stainless steel crock pot in the background. Crockpot Breakfast Casserole
  • Chicken Gnocchi Soup in a white bowl with a rustic wood background and breadsticks in a white and blue striped linen behind it. Copycat Olive Garden Chicken Gnocchi Soup

Footer

  • About The Gracious Wife
  • Contact Us
  • Copyright Notice
  • Privacy Policy
  • Disclosure

You can find me here too!

  • Facebook
  • Instagram
  • LinkedIn
  • Pinterest
  • Twitter
  • YouTube

Disclosure

The Gracious Wife is a participant in the Amazon Services LLC Associates Program, an affiliate advertising program designed to provide a means for sites to earn advertising fees by advertising and linking to amazon.com. All our thoughts and opinions are our own and we are not paid for or mandated to provide a positive review.

2022© The Medlin Group
  • Blog
  • Contact Us
  • About Us

Copyright © 2022 The Gracious Wife ·

8.7K shares
8.7K shares