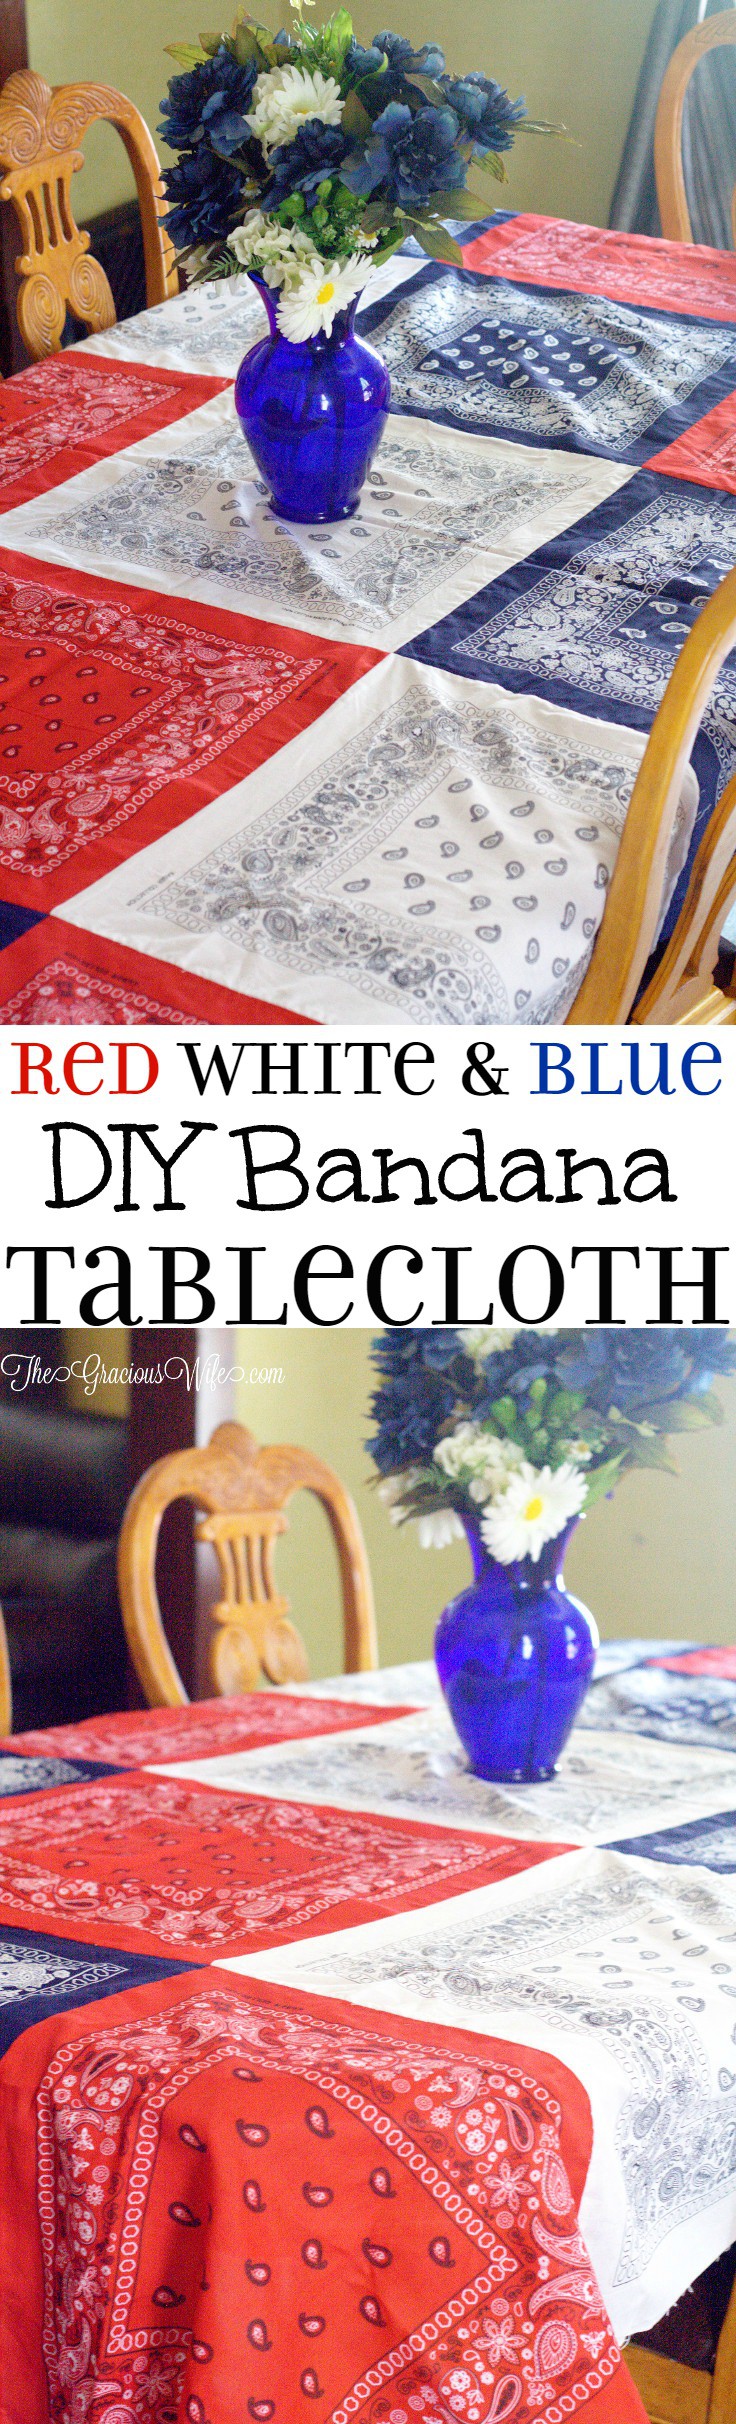
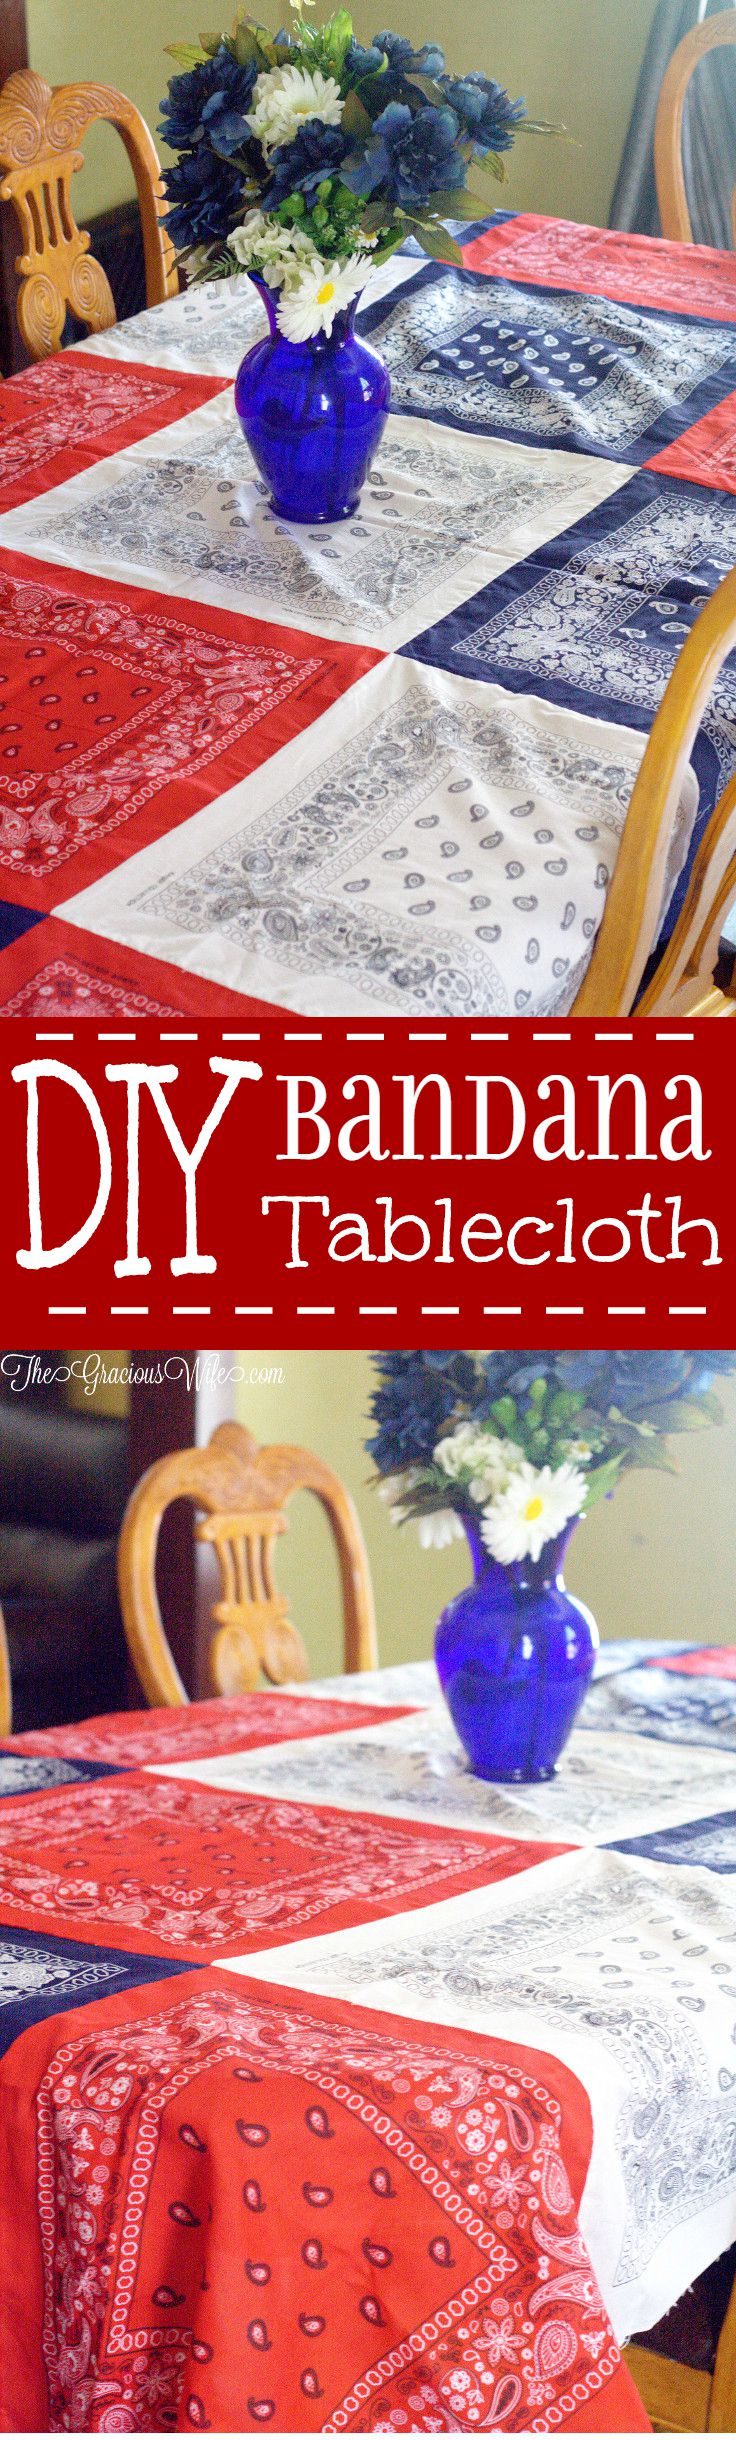
This easy patriotic red, white, and blue DIY Bandana Tablecloth is a fun and frugal Summer and 4th of July patriotic idea, with a full tutorial.
Easy Patriotic DIY Bandana Tablecloth
School is finally out and summer is underway. This year our primary goal is to pay off most of our debt, so we're living even more frugally than normal at the moment.
We have a couple home renovations in the works that are eating up our spare funds. We're currently working on completely remodeling our boys' bedroom and also redoing our current sorry excuse for landscaping.
Anyway, being on a tight budget doesn't stop my nesting tendencies! I still want all the pretty things! Going the DIY route is one of the easiest ways to get all the pretty things and still maintain a budget.
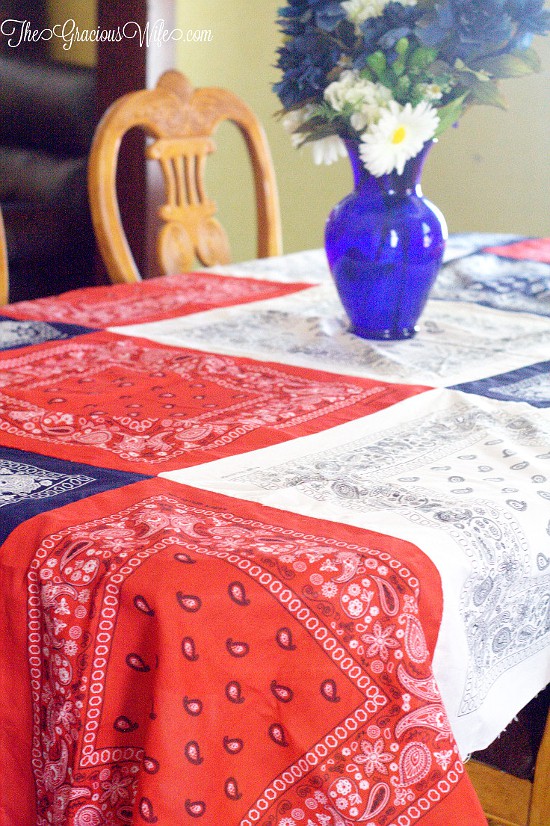
To decorate for Summer and 4th of July this year, I made a pretty and fun patriotic DIY Bandana Tablecloth. It was a super easy DIY project that took less than 30 minutes to make, and I'm in love with the results!
Here are some things I used to make this Patriotic DIY Bandana Tablecloth
1. Quarter Inch Seam Foot - I like to use this foot whenever I'm quilting as it guides you to make a perfect and straight quarter inch seam.
2. Red, White, and Blue Bandanas - You can probably find these for fairly cheap at your local dollar store. I ordered each color in bulk so that I had some leftover for more DIY projects. The price came out to less than a dollar per bandana (about $0.76 each). Here are the bandanas that I ordered: Red Bandanas, White Bandanas
, Blue Bandanas


Directions for DIY Bandana Tablecloth
1. Calculate how many bandanas you will need. I just laid the bandanas across our dining room table to see how many would fit. I came up with three large bandanas across and 5 for length (3 x 5). Your tablecloth dimensions will vary depending on how big your table is and how big the bandanas are.
2. Next I ironed my bandanas. It's important step whenever you're sewing to make sure your seams line up accurately.
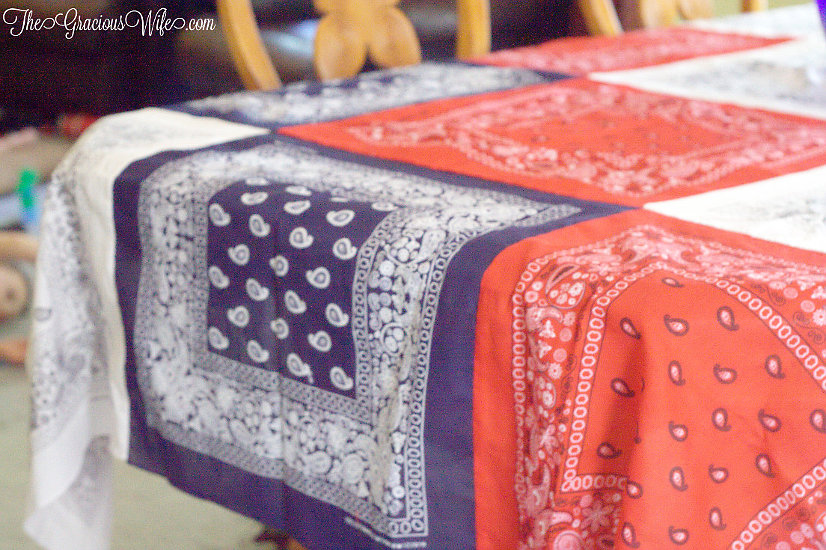
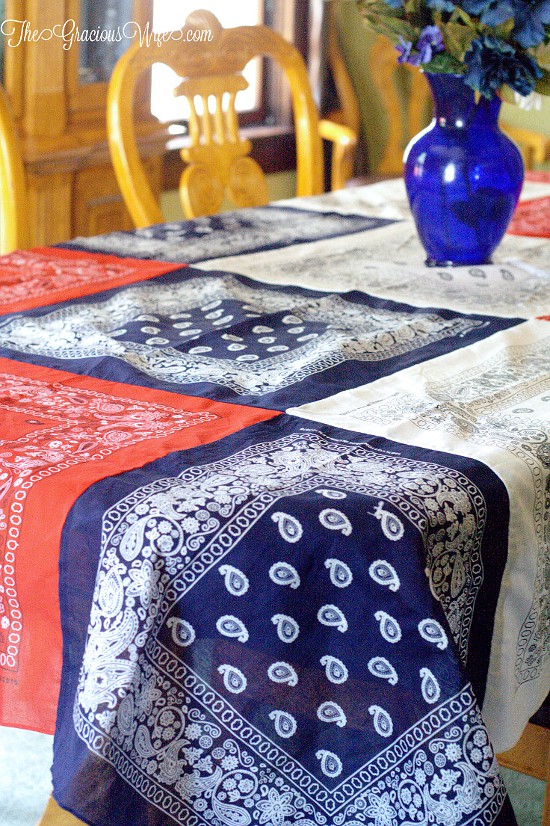
3. Lay out the bandanas in the order that you need to sew them. So basically, lay them out exactly how you want your DIY Bandana Tablecloth to look when you're done sewing. Seeing them laid out will help you to perfect the pattern and make adjustments.
4. Sew the rows. Start sewing the rows together, using a quarter inch seam. I had five rows of 3 bandanas. For more detailed instructions, check out How to Piece a Quilt.
5. Lay your rows out again, in the correct order. Now we're going to sew our rows together to make one big DIY Bandana Tablecloth. Take your first two rows, and lay them on top of each other so that the tops (the part you want showing when you're done sewing) are facing toward each other. Pin the rows together, paying careful attention to pin the seams so that they meet up exactly. You can find a detailed tutorial here at Piecing Your Quilt Top.
6. Sew the rows together, repeating the pinning process for each row, until your whole DIY Bandana Tablecloth is connected.
7. Trim any loose or exposed threads.
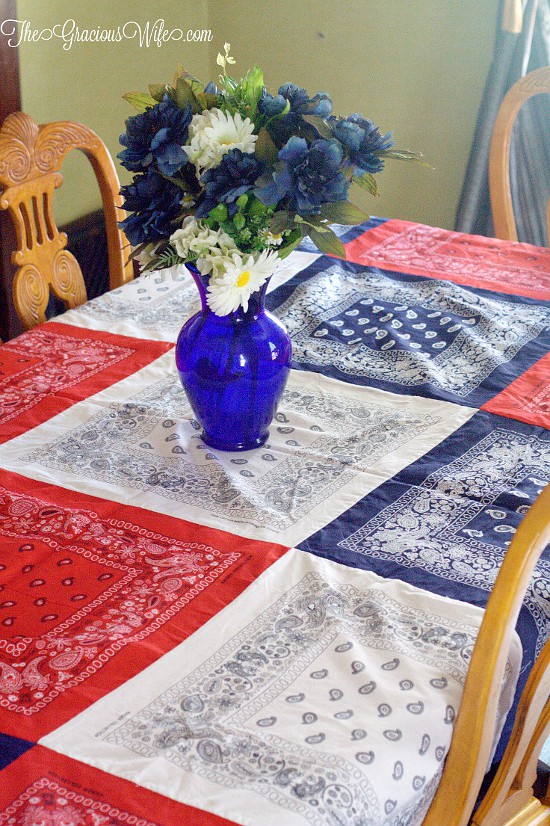
That's it! You should now have a fun and festive Patriotic DIY Bandana Tablecloth! Use it in your home, or outside for a BBQ or cookout. It's also a super fun idea for a picnic blanket.
Did you like this DIY Bandana Tablecloth idea? Find more on my DIY & Crafts, Sewing, and Summer Days boards on Pinterest!
If you liked this DIY Bandana Tablecloth, you might also like these:
How to Make a Quilt for Beginners

Old Rake Head to Rustic Utensil Holder
Never Miss a Thing!
Join our newsletter to get new recipes, tips, tricks, and tutorials every week!

Kati says
Your tablecloth is beautiful. I love the classic look of the bandanas. Thanks for the tutorial!
All that's Jas says
I adore this idea! Perfect for 4th of July! Thank you for linking up with Thursday favorite Things and I hope you have a glorious day!
Sarah R. says
Ooooh I have been on such a bandana kick- in fact I'll be posting a vintage bandana upcycling project this week!! Your tablecloth is fantastic, I just love it! Hurray for awesome posts on Snickerdoodle Sunday- thank you for swinging by this weekend!
Sarah (Sadie Seasongoods)
Nicole says
I LOVE the way this turned out! It was such a great idea, too! I found you on the #SewDarnCrafty linky party and will definitely be pinning. If you have not linked up with us already, would you share this at our #HomeMattersParty at http://notimefordiy.com/2015/06/11/home-matters-linky-party-41/
Bonnie says
I love it! It's perfect for the 4th of July! I would love for you to link up to the Stitch It, Blog It, Share It Link Party going on now at BehindtheSeamsSewing.com.
~Bonnie
carolyn | homework says
Thank you so much for sharing your wonderful creativity on The Inspiration Board at homework. I loved your project and featured you today.
http://www.carolynshomework.com/2015/06/the-inspiration-board-spotlight-210-al.html
carolyn ~ homework
Karin Helton says
Did you wash the bandanas before sewing them?
Michelle says
Yes, I did. Washed and ironed.
Lisa // Cucicucicoo: Eco Sewing and Crafting says
I love how this looks! Very casual, but a fantastic look! 🙂 Lisa
Michelle says
Thank you!
Vickie says
very cute;) wondering how to finish the seams? I have a regular sewing machine. thanks
Kim says
Bandannas are so random and not usually very square. Curious how your addressed the edges when they didn’t line up? Did u cut and and square them after you sew the rows together?
Michelle says
I bought them in a bulk package and they were all the same. You can also just cut them down to whatever size your smallest bandana is.
Leslie says
Should you preshrunk the bandannas first?
Michelle says
I would wash first, yes.