A simple but adorable penguin Peso Cake tutorial that your Octonauts fanatic will love.

Peso Cake
Our Baby Boy turned 4 this past Fall. Man, time is just flying by! Baby Boy has a big obsession with the ocean. It all started with Nemo, and his most recent addiction is Octonauts. So we had an Octonauts birthday party for him this year.
His favorite Octonauts character is Peso since he's the paramedic and Daddy's one too. Baby Boy wants to grow up and help people just like Peso. And Daddy. So I wanted to make him a special Peso cake for his birthday, that was enough to suit even my novice cake decorating skills.

Supplies to Make Your Own Peso Cake
- Layer cake, baked, filled, and well chilled
- Double batch buttercream frosting
- 1-2 tablespoons cocoa powder
- Black Food Coloring
- Orange Food Coloring
- Light Blue Food Coloring
- Cake Decorating Tips (I just have 2 sets of tips that cover pretty much all purposes- This set
has basically every little tip you can think. And I also use this larger tip set
, specifically for the 1M tip for cupcakes)
- In this tutorial, I specifically used tips: 2A
, round tip 4
, open star tip 16
, open star tip 21
, and 104 petal tip
.
- In this tutorial, I specifically used tips: 2A
- 4 decorating bags (These are my favorite
)
- 2 couplers
Directions for Peso Cake
1. Start by dirty icing or crumb coating your cake, which is basically just adding a thin layer of frosting over the cake to fill in any cracks, gaps, or holes and to keep any cake crumbs from making their way into your final, smooth design. I just use a straight spatula like this one to make it smooth. If you want to see it being done, you can check out this video. It's really very simple. When you're done crumb coating your cake, pop it back in the refrigerator to chill again for about an hour.
2. While your cake is chilling, we'll prep the frosting. Separate 1 cup of buttercream, add the orange food coloring and mix well. Set aside. Separate ½ cup of frosting, add the light blue food coloring
, and mix well. Set aside. Separate 1 cup of frosting, and leave it white. Set aside. For the remaining frosting, add 1 tablespoon of cocoa powder and the black food coloring
and mix well. If your frosting is looking a little purple instead of black, add an additional tablespoon of cocoa powder.
3. Put a coupler on each of 2 separate bags, a large round tip (like the Wilton 2A tip
) on the third bag, and the 104 petal tip on the last bag. Place the white frosting and orange frosting in the bags with couplers
. Fill the bag with the petal tip
with the blue frosting. And fill the bag with the round tip 2A
with as much black frosting as you think you can handle at once; this bag is the one you will use to actually frost the cake.
4. When your cake has chilled, remove it from the refrigerator, and begin frosting it using the bag with the round tip. To frost, just pipe the frosting all the way around the cake, kind of in a spiral, so that the whole thing is covered. Then go back and smooth it out with your straight spatula. It's much easier to get a smooth cake with buttercream using this piping technique.
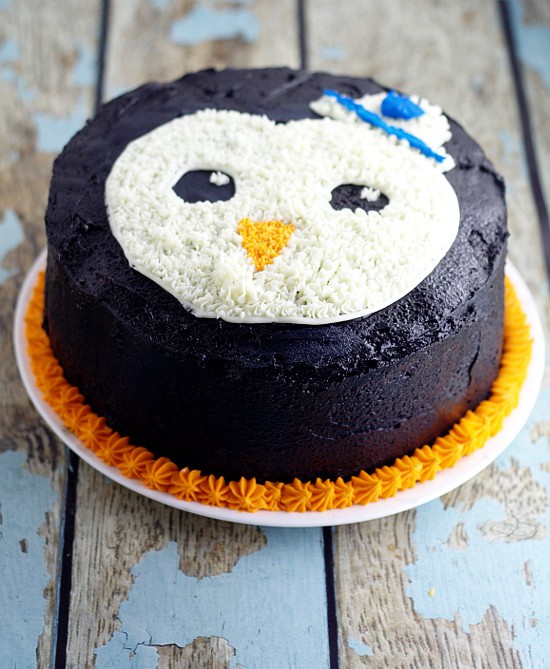
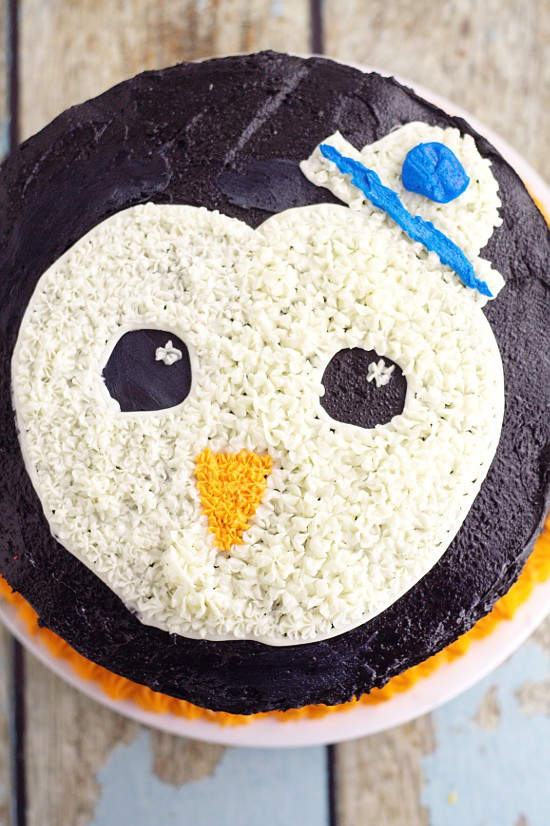
5. Put a size 4 round tip on the bag of white frosting with the coupler. Draw a large rounded heart shape with the white frosting in the center of the cake for the face. Draw 2 small circles for the eyes, and an upside down triangle for the beak. Then for the hat, draw a skinny rectangle to the top right of the heart shape. Then draw a semi-circle on top of the skinny rectangle. I like to sketch on paper so that I can get the feel before doing the frosting. And the great thing is, it's easy to "erase" mistakes because the frosting will just wipe right off.
6. Put a medium-sized star tip on the white frosting (I used a Wilton Open Star Tip 16). Fill in the face and the hat by piping in small stars until the area is completely covered with white. Be sure eyes and beak alone for now.
7. When the entire area is filled in, pipe in 2 small white stars on the eyes.
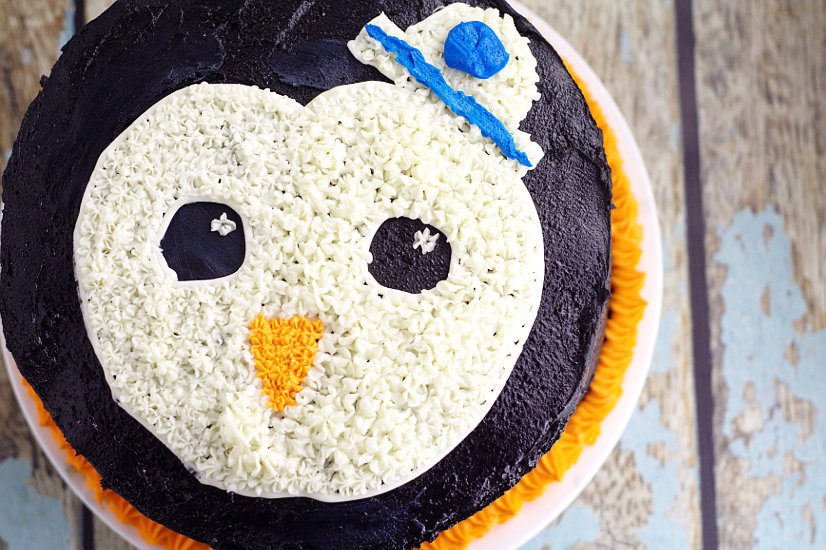
8. Take the star tip off the white frosting, rinse completely, then attach it to the bag of orange frosting with the coupler. Using the same technique, fill in the beak by piping small stars with the orange frosting.
9. To finish Peso's hat, make a ribbon by piping the blue frosting across the rectangle part of the hat. Then make a circle on the top part of the hat.
Your Peso cake is now ready for the party!
Did you like this Peso Cake tutorial? Find more on my Cakes & Cupcakes, Party Cakes, and Party Ideas boards on Pinterest!
If you liked this Peso Cake tutorial, you might also like
Never Miss a Thing!
Join our newsletter to get new recipes, tips, tricks, and tutorials every week!


Sam says
This is so adorable! I definitely could have used this a few years ago when my son was obsessed with Octonauts!
Morgan @ Morgan Manages Mommyhood says
This is absolutely adorable! I love how easy it seems! My dude love Octonauts as well!