
Freezing berries at home can make it possible to save money, prevent waste, and best of all, always have berries on hand for smoothies, desserts, and more! Use this super simple how to freeze berries tutorial to freeze all your favorite berries!

How to Freeze Berries
Do you love berries? Strawberries, blueberries, raspberries and more are so tasty, but can be quite pricey if you don’t purchase them in season.
Buying them in bulk when they are in season is the best way to get the most for your money, especially if you can find a you-pick farm near you and pick as many as your heart desires. But what if you can’t eat them all before they go bad?
Freezing them is a great way to make those berries last! They can be used in smoothies, desserts, baked goods, and a variety of other healthy recipes, and they keep for at least 3-6 months. Plus, it's so simple to do, with absolutely no special equipment necessary.
What Do You Need to Freeze Berries?
The list is pretty simple, you probably already have everything you need right at home! Here's what you'll need to get started:
- Berries
- Colander or strainer
- Towel or paper towel
- Baking sheet
- Parchment or wax paper, or a silicone mat
- Measuring cup (optional)
- Freezer bags
- Permanent marker
Let's get started!
How to Freeze Assorted Berries
Step 1: Washing
The first step is washing your berries. Place them in a colander or strainer and run them under cold water to rinse without cooking or crushing. Warm or hot water can make them mushy, so be sure it's cool.
Gently toss the berries to make sure they've all been rinsed.
Step 2: Drying
Lay your berries out on a towel or paper towel. Gently pat dry. You want them as dry as possible to prevent frost and freezer burn from forming on your berries.
Step 3: Cutting and prepping
For strawberries, you will want to at least cut the tops off where the stem grows. You can also choose to cut them down into smaller pieces if you think you'll be using them in baked goods.
For blueberries, raspberries, blackberries, and other small berries, be sure all stems and leaves are removed and any unripe or otherwise unworthy berries are thrown out.
Step 4: Freezing Berries
Place a sheet of parchment paper, wax paper, or a silicone mat. Lay berries out flat on the baking sheet, making sure none are touching each other. This will ensure they will freeze individually instead of in clumps.
Place the baking sheet flat in the freezer for at least an hour, or until all berries are frozen. The time it takes for your berries to freeze will depend on their size. Bigger berries will take longer than smaller ones.
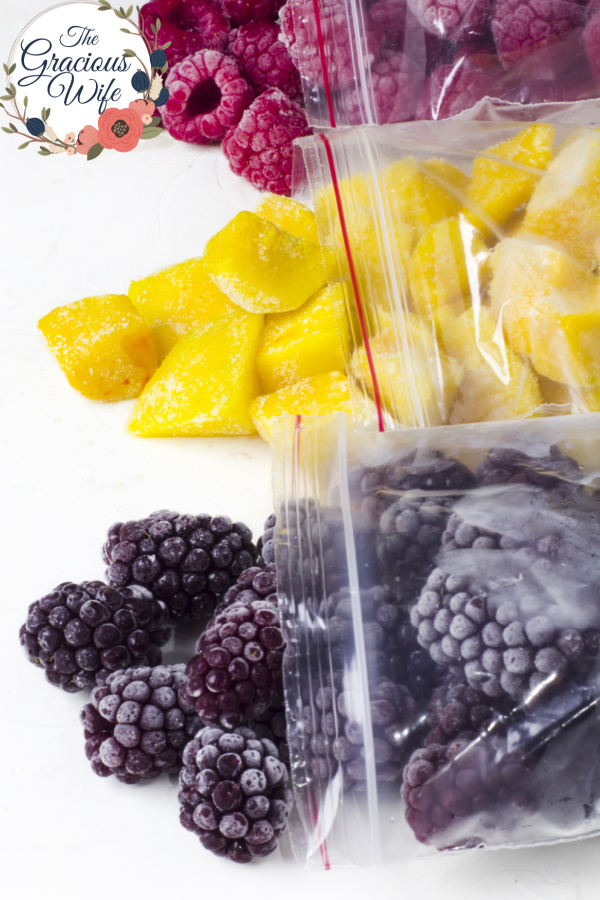
Step 5: Transfer to Freezer Bags
When your berries are frozen, it's time to transfer them to their final freezing destination.
You can freeze in large freezer bags with all of the berries together, or you can choose to use smaller bags with only 1 or 2 cups of berries per bag. I prefer this method if I know I'll be using them in baked goods, as it's easier to just dump them in pre-measured.
Whichever method you choose, be sure to label your bag with a permanent marker with the type of berries, the date, and if you measured, how much is in each bag.
Place the bags into the freezer.
How Long Will Frozen Berries Last?
Frozen berries can be kept for up to 6 months, depending on the freezer. Deep freezers can keep longer.
What Can I Use Frozen Berries For?
- Smoothies (and you can use this same method to freeze bananas for smoothies too!)
- Yogurt topping
- Ice cream topping
- Sauces
- Puddings
- Beverages - like this Berry Spritzer
- Homemade ice cream - you mix the berries right in!
- Mixed into oatmeal
- Muffins - like these Raspberry Muffins
- In frostings - like this Strawberry Buttercream
- Cakes and cupcakes - like these Berries and Cream Cupcakes
- Crisps and crumbles - like this Blueberry Peach Crumble
- Coffee Cakes and Buckles - like this Blueberry Buckle
- And so much more!

How to Freeze Berries
Ingredients
- 2 cups (or more) fresh berries
Instructions
- Wash your berries under cold water in a strainer or colander.
- Remove berries to a towel or paper towel to dry. Pat dry if necessary.
- Prepare berries by removing stems and leaves, and cutting large berries, such as strawberries, down into smaller pieces.
- Line a baking sheet with parchment or wax paper or a silicone mat. Lay dry and prepped berries flat on the baking sheet without touching one another.
- Lay baking sheet flat in the freezer for at least 60 minutes, or until berries are fully frozen.
- Remove from the freezer and use a spatula to scrape frozen berries off of the baking sheet.
- Label a freezer bag with the date, type of berry, and how much, and place berries in the bag. Remove as much air as possible before returning to the freezer to prevent freezer burn.
- Store berries in the freezer for easy access to frozen berries for smoothies and baking for up to 3 months.
Notes
- Do not return defrosted berries to the freezer.
- If freezing strawberries, consider slicing them into smaller pieces, such as halves or quarters.
- Larger berries, such as whole strawberries, will take longer to freeze than smaller berries such as blueberries.
- This method also works for freezing bananas for smoothies.
Never Miss a Thing!
Join our newsletter to get new recipes, tips, tricks, and tutorials every week!


Dannii says
We always keep frozen berries in the freezer. Perfect for smoothies in the summer.
Sarah says
Perfect day to receive this email! We just got home from picking strawberries at our local farm. Thanks for the instructions.
Michelle says
What a happy coincidence 🙂
Summer Yule says
Great tips! I'm looking forward to berry picking season 🙂